Mysql 主从概念
mysql 的主从复制,是用来建立一个和主数据库完全一样的数据库环境,从库会同步主库得所有数据,可轻松实现故障转移。
mysql 主从主要作用
- 实现数据备份;
- 基于数据备份,实现故障转移;
- 基于数据备份,实现读写分离;
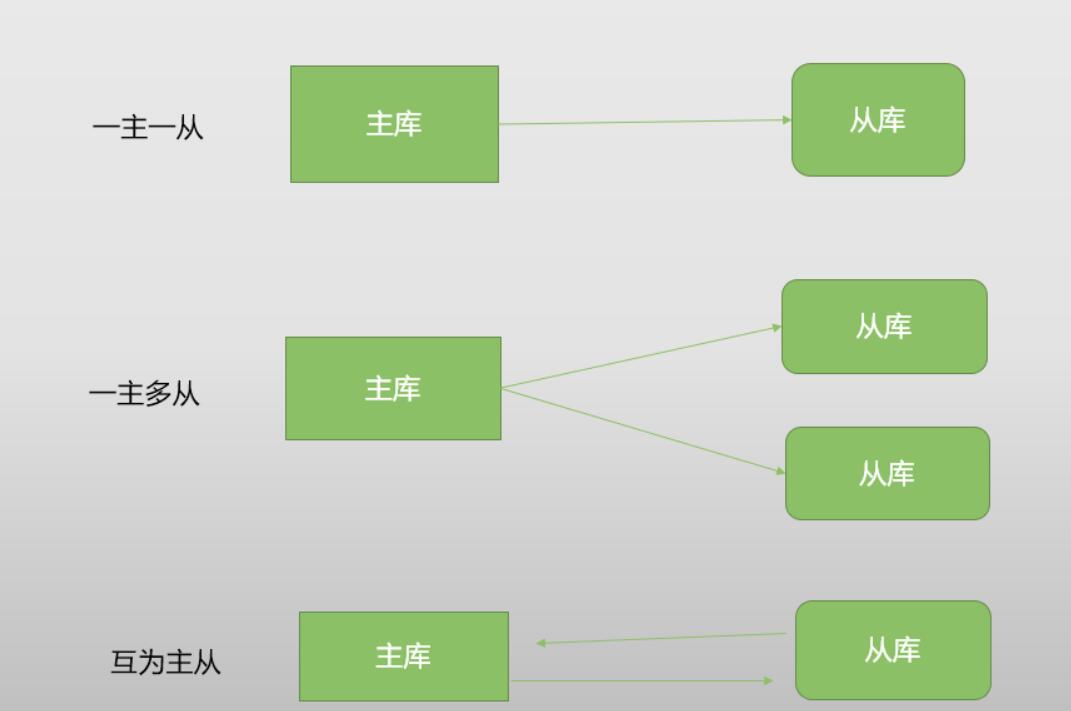
常见 mysql 主从架构

MySQL 主从部署
master: 192.168.75.130
slave: 192.168.75.135
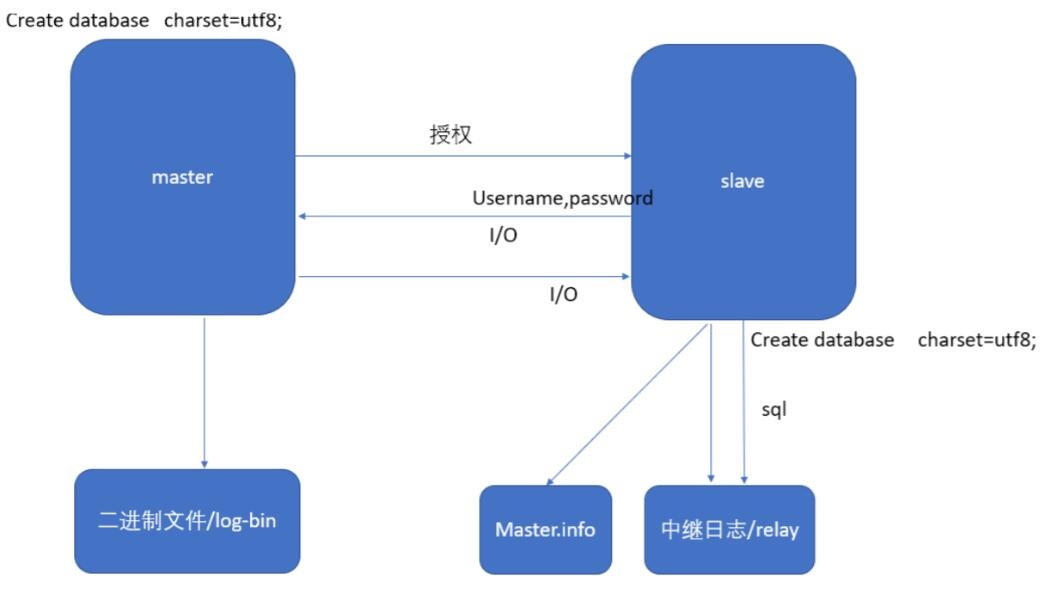
主从工作原理

master 端配置
# 安装好mysql/mariadb数据库:
yum install mariadb mariadb-server -y
# 修改配置文件,在[mysqld]指令段添加以下行:(/etc/my.cnf)
log-bin=xiaobei-bin
server-id=1
# 启动数据库服务:
[root@localhost ~]# systemctl start mariadb
[root@localhost ~]#
# 查看mysql进程:
[root@localhost ~]# ps -ef |grep mysqld
mysql 2040 1 0 01:15 ? 00:00:00 /bin/sh /usr/bin/mysqld_safe --basedir=/usr
mysql 2203 2040 0 01:15 ? 00:00:02 /usr/libexec/mysqld --basedir=/usr --datadir=/data/mysql --plugin-dir=/usr/lib64/mysql/plugin --log-error=/var/log/mariadb/mariadb.log --pid-file=/var/run/mariadb/mariadb.pid --socket=/var/lib/mysql/mysql.sock
root 2316 1946 0 02:05 pts/0 00:00:00 grep --color=auto mysqld
# 查看mysql端口:
[root@localhost ~]# netstat -ntlp |grep 3306
tcp 0 0 0.0.0.0:3306 0.0.0.0:* LISTEN 2203/mysqld
查看配置是否生效
# 通过mysql直接进入数据库:
[root@localhost ~]# mysql
Welcome to the MariaDB monitor. Commands end with ; or \g.
Your MariaDB connection id is 3
Server version: 5.5.65-MariaDB MariaDB Server
Copyright (c) 2000, 2018, Oracle, MariaDB Corporation Ab and others.
Type 'help;' or '\h' for help. Type '\c' to clear the current input statement.
MariaDB [(none)]>
# 查看log_bin和sql_log_bin是否均为on;
MariaDB [(none)]> show variables like "%log_bin";
+---------------+-------+
| Variable_name | Value |
+---------------+-------+
| log_bin | ON |
| sql_log_bin | ON |
+---------------+-------+
2 rows in set (0.00 sec)
授权从库
MariaDB [(none)]> grant replication slave on *.* to "tongbu"@"192.168.75.135" identified by "123456";
MariaDB [(none)]> flush privileges;
Query OK, 0 rows affected (0.00 sec)
查看 master 状态
MariaDB [(none)]> show master status;
+--------------------+----------+--------------+------------------+
| File               | Position | Binlog_Do_DB | Binlog_Ignore_DB |
+--------------------+----------+--------------+------------------+
| xiaobei-bin.000002 |      476 |              |                  |
+------------------+------------+--------------+------------------+
1 row in set (0.00 sec)
slave 端配置
# 修改配置文件,在[mysqld]指令块下添加如下行:(/etc/my.cnf)
server-id=2
启动数据库服务
[root@localhost ~]# systemctl start mariadb
指定 master
MariaDB [(none)]> change master to
    -> master_host="192.168.75.130",
    -> master_user="tongbu",
    -> master_password="123456",
    -> master_log_file="xiaobei-bin.000002",
    -> master_log_pos=476;
查看 slave 状态
MariaDB [(none)]> slave start;
Query OK, 0 rows affected (0.00 sec)
MariaDB [(none)]> show slave status\G
*************************** 1. row ***************************
Slave_IO_State: Waiting for master to send event
Master_Host: 192.168.75.130
Master_User: tongbu
Master_Port: 3306
Connect_Retry: 60
Master_Log_File: tongbu-bin.000002
Read_Master_Log_Pos: 476
Relay_Log_File: mariadb-relay-bin.000002
Relay_Log_Pos: 529
Relay_Master_Log_File: tongbu-bin.000002
Slave_IO_Running: Yes
Slave_SQL_Running: Yes
Replicate_Do_DB:
Replicate_Ignore_DB:
Replicate_Do_Table:
Replicate_Ignore_Table:
Replicate_Wild_Do_Table:
Replicate_Wild_Ignore_Table:
Last_Errno: 0
Last_Error:
Skip_Counter: 0
Exec_Master_Log_Pos: 476
Relay_Log_Space: 825
Until_Condition: None
Until_Log_File:
Until_Log_Pos: 0
Master_SSL_Allowed: No
Master_SSL_CA_File:
Master_SSL_CA_Path:
Master_SSL_Cert:
Master_SSL_Cipher:
Master_SSL_Key:
Seconds_Behind_Master: 0
Master_SSL_Verify_Server_Cert: No
Last_IO_Errno: 0
Last_IO_Error:
Last_SQL_Errno: 0
Last_SQL_Error:
Replicate_Ignore_Server_Ids:
Master_Server_Id: 1
1 row in set (0.00 sec)
验证数据同步
# 在主库创建一个数据库:
MariaDB [(none)]> create database xiaobei charset=utf8;
Query OK, 1 row affected (0.00 sec)
MariaDB [(none)]> show databases;
+--------------------+
| Database |
+--------------------+
| information_schema |
| xiaobei |
| mysql |
| performance_schema |
| test |
+--------------------+
# 在从库查看:
MariaDB [(none)]> show databases;
+--------------------+
| Database |
+--------------------+
| information_schema |
| xiaobei |
| mysql |
| performance_schema |
| test |
+--------------------+
5 rows in set (0.00 sec)
同步错误分析
Slave_IO_Running: Connecting
# 第一种:主库宕机
# 第二种:从库指定的用户名与密码错误(与主库授权的用户名和密码不一致)
# 第三种:关闭防火墙

Slave_IO_Running: No
# 从库指定的二进制文件有误

Slave_SQL_Running: No
# pos点问题
主从复制延迟问题及解决方法
从库过多
建议从库数量 3-5 为宜,要复制的从节点数量过多,会导致复制延迟。
从库硬件差
从库硬件比主库差,导致复制延迟,查看 master 和 slave 的系统配置,可能会因为机器配置的问题,包括磁盘 IO、CPU、内存等各方面因素造成复制的延迟,一般发生在高并发大数据量写入场景。
网络问题
主从库之间的网络延迟,主库的网卡、网线、连接的交换机等网络设备都可能成为复制的瓶颈,导致复制延迟。
Mysqldump 备份
只备份表,不备份数据本身
# 备份zabbix数据库中的所有表,但是不会自动生成创建zabbix数据库的语句:
mysqldump -uroot -p*** zabbix > zabbix.sql
备份数据库与表
# 备份zabbix数据库中的所有表,并且会生成创建zabbix数据库的SQL语句,也就是导入时不需要先创建数据库:
mysqldump -uroot -p*** --databases zabbix > zabbix.sql
备份多个数据库
mysqldump -uroot -p*** --databases zabbix mysql > zabbix_mysql.sql
备份所有数据库
mysqldump -uroot -p*** --all-databases > all.sql

# 或者
mysqldump -uroot -p*** -A > all.sql
备份 zabbix 数据库,并且记录 pos 点
mysqldump -uroot -p --master-data zabbix > zabbix.sql
备份数据库,并刷新日志
mysqldump -uroot -p --master-data --flush-logs zabbix > zabbix.sql